本文将介绍如何把自己开发出来的 jar 包发布到 Maven 中央仓库 ,以便将好用的工具共享给其他需要的人.
第一步 注册 jira 账号,将 jira 账号名密码 配置到 maven 的 settings.xml 文件中 JIRA 注册地址
修改 mavan 配置文件 settings.xml ,加入以下配置
1 2 3 4 5 6 7 8 9 10 11 12 <servers > <server > <id > sonatype-nexus-snapshots</id > <username > 刚才注册的账号</username > <password > 刚才注册的密码</password > </server > <server > <id > sonatype-nexus-staging</id > <username > 刚才注册的账号</username > <password > 刚才注册的密码</password > </server > </servers >
构件第一次发布需要创建 ISSUE,可以参考我之前创建的 ISSUE
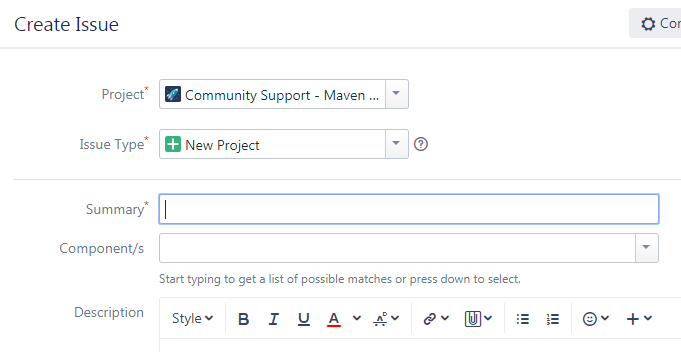
登录 JIRA,点击 Create ,如图:
弹出页面:
需要填写如下几项:
Project:Community Support - Open Source Project Repository Hostinghttps://github.com/zhuyizhuo/code-generator https://github.com/zhuyizhuo/code-generator.git
提示:
group Id 如果自己有个人网址,可填写为自己的网址,如果代码托管在 git ,则填写 com.github.xxxSonatype 的工作人员会询问你那个 Group Id 是不是你的域名,你只需要在上面回答是就行,然后就会通过审核。
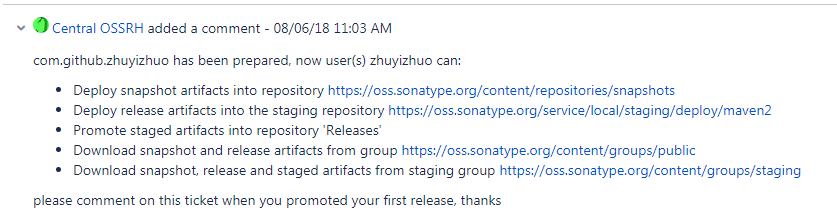
其他内容不用填写,创建 Issue 后需要等待工作人员审核处理,一般一个工作日以内,审批通过后会发邮件通知,当 Issue 的 Status 变为RESOLVED 后,就可以进行下一步操作了,此外,在自己提交的 Issue 下面会看到 Sonatype 工作人员的回复:
如图, 工作人员提示在第一次发布构件后需要提交一下评论,
此处工作人员回复了项目分发位置 即 pom.xml 中需要配置的信息
第二步 配置需要发布项目的 pom.xml 文件 加入如下配置 :(对应路径改为自己项目路径) 1 2 3 4 5 6 7 8 9 10 11 12 13 14 15 16 17 18 19 20 21 22 23 24 25 26 27 28 29 30 31 32 33 34 35 36 37 38 39 40 41 42 43 44 45 46 47 48 49 50 51 52 53 54 <parent > <groupId > org.sonatype.oss</groupId > <artifactId > oss-parent</artifactId > <version > 7</version > </parent > <licenses > <license > <name > Apache 2</name > <url > http://www.apache.org/licenses/LICENSE-2.0.txt</url > <distribution > repo</distribution > <comments > A business-friendly OSS license</comments > </license > </licenses > <distributionManagement > <snapshotRepository > <id > sonatype-nexus-snapshots</id > <name > OSS Snapshots Repository</name > <url > https://oss.sonatype.org/content/repositories/snapshots/</url > </snapshotRepository > <repository > <id > sonatype-nexus-staging</id > <name > OSS Staging Repository</name > <url > https://oss.sonatype.org/service/local/staging/deploy/maven2/</url > </repository > </distributionManagement > <issueManagement > <system > github</system > <url > https://github.com/zhuyizhuo/code-generator/issues</url > </issueManagement > <scm > <url > https://github.com/zhuyizhuo/code-generator</url > <connection > https://github.com/zhuyizhuo/code-generator.git</connection > </scm > <developers > <developer > <name > ZhuYiZhuo</name > <id > ZhuYiZhuo</id > <email > zhu.yizhuo@163.com</email > <roles > <role > Developer</role > </roles > <timezone > +8</timezone > </developer > </developers >
第三步 安装 GPG 并生成秘钥,发布构件到仓库时需要用到 GPG Windows 客户端下载地址 | GPG Mac OS 客户端下载地址
安装 GPG 完毕,打开 CMD 窗口执行命令 gpg --gen-key 按提示输入个人信息,最终输出如下图:
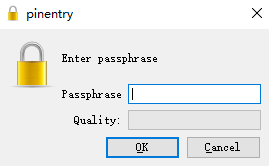
提示: passphrase 第四步 发布过程中进行签名操作的时候会用到
1
2
3
4
5
6
7
8
9
10
11
12
13
14
15
16
17
18
19
20
21
22
23
24
25
26
27
28
29
30
31
32
33
34
C:\Windows\system32>gpg --gen-key gpg (GnuPG) 2.2.15; Copyright (C) 2019 Free Software Foundation, Inc. This is free software: you are free to change and redistribute it. There is NO WARRANTY, to the extent permitted by law. Note: Use "gpg --full-generate-key" for a full featured key generation dialog. GnuPG needs to construct a user ID to identify your key. Real name: zhuyizhuo Email address: zhu.yizhuo@163.com You selected this USER-ID: "zhuyizhuo <zhu.yizhuo@163.com>" Change (N)ame, (E)mail, or (O)kay/(Q)uit? O We need to generate a lot of random bytes. It is a good idea to perform some other action (type on the keyboard, move the mouse, utilize the disks) during the prime generation; this gives the random number generator a better chance to gain enough entropy. We need to generate a lot of random bytes. It is a good idea to perform some other action (type on the keyboard, move the mouse, utilize the disks) during the prime generation; this gives the random number generator a better chance to gain enough entropy. gpg: key 33111BCFE53BEE51 marked as ultimately trusted gpg: directory 'C:/Users/zhuo/AppData/Roaming/gnupg/openpgp-revocs.d' created gpg: revocation certificate stored as 'C:/Users/zhuo/AppData/Roaming/gnupg/openpgp-revocs.d\9E2FB80F2047C634965B5F2C33111BCFE53BEE51.rev' public and secret key created and signed. pub rsa2048 2019-06-06 [SC] [expires: 2021-06-05] 9E2FB80F2047C634965B5F2C33111BCFE53BEE51 uid zhuyizhuo <zhu.yizhuo@163.com> sub rsa2048 2019-06-06 [E] [expires: 2021-06-05] C:\Windows\system32>
上传公钥到服务器,用来发布 jar 的时候进行签名验证,执行命令:gpg --keyserver hkp://keyserver.ubuntu.com:11371 --send-keys [密钥]
执行结果如下:
1
2
3
C:\Windows\system32>gpg --keyserver hkp://keyserver.ubuntu.com:11371 --send-keys 9E2FB80F2047C634965B5F2C33111BCFE53BEE51 gpg: sending key 9E2FB80F2047C634965B5F2C33111BCFE53BEE51 to hkp server keyserver.ubuntu.com
(此步骤为建议配置,并非必须,方便忘记 passphrase 后查看)
将 passphrase 配置到 maven 的 setting.xml 文件中 标签中
1 2 3 4 5 6 7 8 9 10 11 12 13 <profiles > <profile > <id > sonatype-oss-release</id > <activation > <activeByDefault > true</activeByDefault > </activation > <properties > <gpg.executable > gpg</gpg.executable > <gpg.passphrase > 你的 Passphase 密码</gpg.passphrase > </properties > </profile > </profiles >
第四步 发布 jar
在项目根目录下打开 cmd 命令行执行以下命令 弹出密码框再次输入密码
1 mvn clean deploy -P sonatype-oss-release -Darguments="gpg.passphrase=你的 Passphase 密码"
发布成功后即可到 构件仓库 中查看了。
第五步 Release 进入 构件仓库 查看发布好的构件,构件仓库的用户名密码即 JIRA 的用户名 密码。
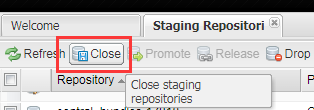
登录后,点击左侧的Staging Repositories,一般最后一个就是刚刚发布的 jar 了,此时的构件状态为open。
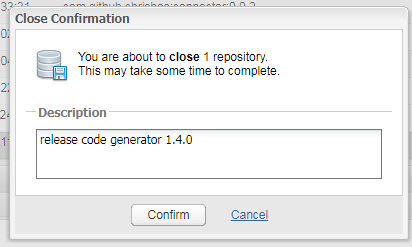
选中刚才发布的构件,并点击上方的 close ,弹出页面点击 Confirm。
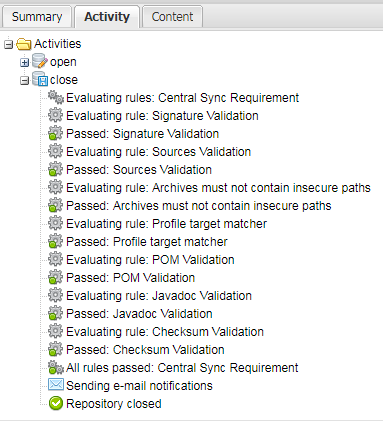
在下边的 Activity 选项卡中查看状态,确保状态变成 closed:
如果 close 未成功 则查看是哪项失败,处理问题后 重复 第四步 -> 第五步 一直到 closed 为止
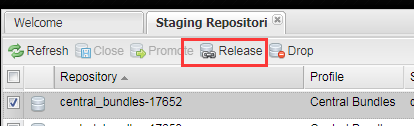
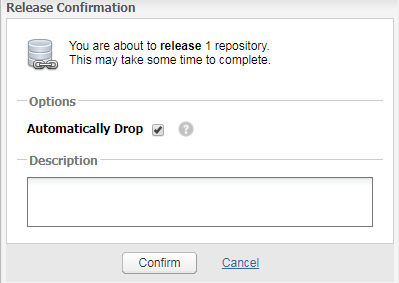
选中状态为 closed 的构件点击 Release,弹出页面点击 Confirm。
如图勾选,则发布成功后构件自动从 Staging Repositories
在下边的 Activity 选项卡中查看状态,如果是第一次发布,成功后需要去 JIRA 回复评论。
全部操作成功后,构件就发布完毕了,剩下的就是耐心等待构件同步到 maven 的 中央仓库 (通常为几个小时)。
第六步 升级 jar 包 升级 Jar 包比初次发布的步骤简单的多,我们只需要更新项目工程代码,并修改 pom.xml 文件里面的版本号,最后重新执行上面的 第四步 和 第五步 即可。
参考链接:
GPG 入门教程 如何发布 jar 包到 maven 中央仓库